Oct 2 2014

Recipe: Farro and Kale Salad with Olives

I love farro, and I love olives, and I like kale as much as the next Californian, so I thought I’d throw up a quick link to this recipe from Food & Wine. It makes a terrific lunch.


Jul 25 2013

Recipe Link: Kale and Cabbage Salad

This summer I’ve found myself making a lot of Ingrid Steblea’s kale salad. It’s almost like an aggressive coleslaw with a lovely dark and tangy bite. To my mind the only drawback of the recipe is that it requires advance preparation, so whenever I think to myself “you know what, self, we could really go for some kale and cabbage salad right now,” it’s actually a few hours from being IN MY MOUTH.


Jun 6 2013

Salmon with Lavender-Fennel Salt

It’s my birthday! In honor of the occasion my bff Nina has gotten me the bestest present—she’s flown across the country for a visit! I have planned out a meticulous itinerary of feasting, spa-tripping, and sitting around in loose-fitting clothes admiring our pedicured toes and talking about all the delicious food we have just eaten.

To kick things off, last night I made a dinner of raw oysters in mignonette sauce as a first course, a main dish of salmon with lavender-fennel salt and pan-seared asparagus with shaved parmesan, and a fruit and cheese course consisting of fresh peaches, blueberries, and a wedge of St. Pat cheese from Cowgirl Creamery.

Nina said she wanted the salmon recipe so here it is!

salmon fillets

You start with four wild salmon fillets, skin-on, about six ounces each. Preheat the oven to 300 degrees and line a baking sheet with aluminum foil.

Check your salmon for little bones and pull them all out. Then combine a teaspoon of black peppercorns, a teaspoon of coarse sea salt, a teaspoon of fennel seeds, and a teaspoon of fresh lavender blossoms. Grind it all up using a spice grinder or a mortar and pestle. (Keep grinding until the peppercorns have all been turned into pepper.)

Brush your salmon fillets with olive oil on both sides and lay them, flesh side up, on the baking sheet. Season them evenly with the lavender-fennel salt, pressing it firmly into the salmon. Bake for about thirty minutes or until a food thermometer inserted into the thickest part of the salmon reads 140 degrees.

(Recipe adapted from The San Francisco Ferry Plaza Farmer’s Market Cookbook.)


Apr 2 2013

Peggy Fleming’s Cottage Cheese Dill Bread

dill bread

This is the recipe that made me learn to cook.

Well, bake. I started off baking. Baking’s not easier than stovetop cooking but it involves, for the most part, a different set of skills. The two that were hardest for me were: a) learning the right temperature of ingredients for yeast, and b) learning to judge how much kneading different types of dough require.

As far as a) goes, I killed a lot of yeast by mixing it with water or milk that was too hot. The classic rubric is that liquid for activating yeast should be the same temperature as the inside of your wrist, but the truth is that you want it just a little hotter, to start with, because your bowl is probably cold. Yeast won’t tolerate really hot liquid though, and initially I was far more likely to get the temperature too hot than too cool.

And as far as b) goes, I baked a lot of rocklike soda breads before I finally learned that quick breads require a much gentler touch than yeast breads. In general I have a pretty heavy kneading hand, so the kneading times suggested in recipes are often longer than my doughs actually require. It just takes experience to get to the point where you recognize what dough feels and looks like when it’s underworked, overworked, or just right: “smooth and elastic” is what the recipes will say, meaning that it bounces back when you poke a finger into it, but that can describe a range of doughs and in the end there’s not much substitute for practice.

Anyway, this bread. I was talking to my mom about this bread, and she said, “Do you remember our Sunday night dinners, when we would just eat dill bread and cheesecake?”

“NO,” I said, “but that sounds amazing.” Dill bread and cheesecake were my two absolute favorite foods as a kid. Those Sunday night dinners must have been like heaven.

I know they didn’t happen every Sunday, though, or even particularly frequently, because if Mom had made the dill bread that often I probably never would’ve started cooking. It was craving for fresh baked dill bread that drove me to dig out the yellowing newspaper clipping that held this recipe and start figuring out how to get around in a kitchen.

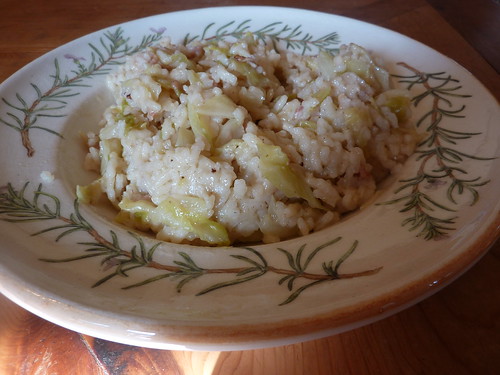
You don’t taste the cottage cheese, by the way: it just imparts a moist richness. This is a pretty forgiving recipe for beginning bakers because, with two packages of yeast, it has a lot of rising power. Also, it is amazingly delicious.

Peggy Fleming’s Cottage Cheese Dill Bread

In a large bowl, mix together two eggs and two cups of cottage cheese. Mince about two tablespoons of onion and two tablespoons fresh dill weed and stir that in too. Now set your bowl aside for a few minutes, because your eggs and cottage cheese probably just came out of the fridge and they’re cold. Your dough will rise faster if you let them get to room temperature before adding the yeast. Go check your e-mail or something.

When you get back, pull out a separate, smaller bowl and pour in half a cup of warm water (but not too warm!). Sprinkle in two packages of yeast. Stir it up (I use my finger, because you can feel the individual yeast granules, and smear them into the water), then mix in two teaspoons of sugar.

Go back to your big bowl of eggs and herbs and cottage cheese. Add a teaspoon of baking powder, two teaspoons of salt, and two tablespoons of sugar. Stir it up.

Your yeast should be foaming now. If it isn’t, give it a couple minutes. When your yeast is active, stir it into the big bowl with the other ingredients. Then gradually stir in about four and a half cups of all-purpose or bread flour, adding the flour a cup at a time and mixing well between every addition. (I am very partial to King Arthur brand flour. If you want to make this recipe a little healthier, you could probably do a half-and-half mix of King Arthur’s all-purpose and “White Whole Wheat” flours, but I haven’t tried this myself.)

Time to knead your dough. Turn it out onto a floured work surface and knead it pretty vigorously until you’ve got a smooth, elastic loaf. It won’t take too long. Then clean out your work bowl, dry it, grease it with butter, and put the dough back in to rise (turning it so that both sides get a little butter). Cover with a tea towel and put it in a warm spot until the dough doubles in size (about an hour to an hour and a half, or longer if you didn’t bring the cottage cheese up to room temperature).

At some point during this time you’ll want to start heating the oven. Set it to 350 degrees, and also grease two loaf pans with butter.

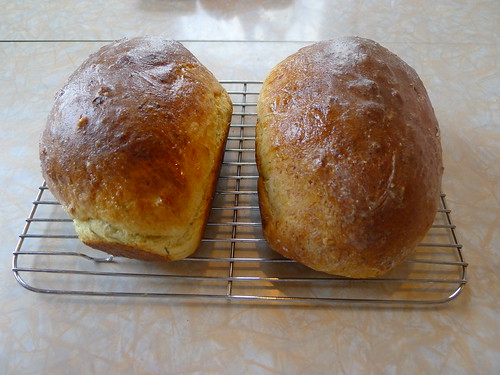
When your dough has doubled in size, punch it down, knead it a few times, then divide into two loaves and place in the greased loaf pans. Bake for thirty minutes or until the tops are nicely browned and the smell of fresh bread is overwhelming you.

Brush the tops of the loaves with butter and let them cool before serving.


Mar 31 2013

Happy Easter!

eggs

This year we used vegetable dyes to make our Easter Eggs. Some of the recipes worked better than others: the red cabbage, turmeric, and yellow onions made beautifully colored eggs. The red onions and beets, on the other hand, resulted in muddy brown eggs. Most importantly, though, mixing up the vegetable dyes was fun. The boys both really got into the whole process of chopping, boiling, stirring, and straining to cook up the dyes. We’ll probably do it again next year.

This morning we had our hunt, which was successful: a full dozen eggs were stalked and laid low by our intrepid hunters.

spoils of the hunt

And several of the eggs were promptly skinned, gutted, and made into sandwiches. We believe in eating what we hunt!

Nanita and Marqueño are on hand again for a few days, to visit with the baby, so they’ll join us tonight for our Easter dinner. I always make “agnello all’araba” (Arabian lamb) from The Silver Spoon Cookbook. It’s a pretty simple recipe, but very delicious. This is a version I’ve adapted slightly to reflect the “salt as you go” philosophy that I’ve picked up from reading Judy Rodgers. (I also switched from kosher salt to sea salt at her recommendation, and I think it makes everything taste better.)

Agnello All’Araba

Preheat the oven to 400 degrees. Season two and a half pounds of boneless lamb cubes liberally with salt, and slice up three onions thinly.

In a small pot, heat up one cup of stock—any kind, or even just water in a pinch. When it’s hot, take a hefty pinch of saffron threads (if your saffron comes in half-gram envelopes, use the whole envelope) and crush them up using a mortar and pestle, or just your fingers. Stir the bruised saffron into the hot water or stock along with two tablespoons of honey and a pinch each of ground cumin, ground ginger, and salt. Keep it warm over low heat.

Meanwhile, put a large, heavy skillet over medium-high heat. Add four tablespoons of olive oil and, when, hot, the onions. Sprinkle them with salt and saute until soft, then move the onions to a roasting pan. Return the now-empty skillet to high heat and brown the lamb cubes, in batches if necessary to ensure that they get a nice crust. Add the browned lamb to the roasting pan. Pour your seasoned water or stock over the meat, cover with aluminum foil, and roast in the oven for an hour.

While the lamb roasts, blanch 3/4 cup pitted, brine-cured green olives in boiling water for five minutes, then drain. Toast 3/4 cup slivered almonds in a small pot or skillet over high heat, removing them from the stovetop as soon as they’re fragrant and beginning to brown.

When the meat has cooked for 50 minutes, take the roasting pan out of the oven, add in the olives and almonds, give everything a good stir, and put it back in the oven for the final ten minutes. Just before serving, sprinkle the meat with fresh chopped cilantro and a generous amount of fresh-ground pepper. (Also, taste a little bit to see if it needs more salt, but it probably won’t.) The Silver Spoon Cookbook notes: “As a side dish, we suggest fresh fava beans boiled in water for 15 minutes, then tossed with butter.”


Aug 31 2012

From the Garden

007

Davy started chirping as soon as I brought in that bowl of cherry tomatoes. “This. This one. Mine. Eat. Matoes! Mmmmm!”

So I put them on a plate for him, cut in half and sprinkled with a little fleur de sel (fancy schmancy!), and he promptly ate them all.

009

The zucchini is destined for tonight’s stir-fry (with tofu, carrots, ginger, and scallions), but I also made a barley salad using some garden herbs:

002

The bell pepper in the salad was supermarket-bought, as the one pepper plant I bought for the garden was an early casualty of the Squash Wars. At this point the tomatoes, zucchini and kabocha squash have carved up the garden bed amongst themselves, with the parsley, basil, mint and chives sort of hanging out around the edges. Next year the squash and zucchini will be moved to their own bed, and I’ll have another try at peppers, eggplant, and leafy greens.

Barley Salad with Fresh Herbs

Adapted from a Whole Foods recipe

Combine three cups of water, a teaspoon of salt, and one cup of pearled barley in a saucepan. Bring to a boil, then reduce the heat to simmer until the barley is tender, about 40 minutes. Meanwhile, in a large bowl, toss 1/2 cup chopped green onions, a diced red pepper, 1/4 cup chopped parsley, 1/3 cup chopped fresh basil leaves, and 2 tablespoons chopped fresh mint leaves. In a second, small bowl, whisk together 1/4 cup mild-tasting olive oil, one or two tablespoons of fresh-squeezed lemon juice, and a clove of garlic that’s either minced or put through a garlic press.

When the barley is cooked, drain it and add to the bowl with the herbs. Toss with the dressing and add salt and pepper to taste.


Feb 22 2012

Nice Day, Scary Weather

It’s beautiful today in Oakland. It’s February and it’s blue-sky, t-shirt weather; things are blooming and buzzing and singing and there’s not a cloud in the sky. And frankly, I find it kind of terrifying.

We got tomatoes in our veggie box this week. Tomatoes! In February! Granted, they were “hoop house” (greenhouse) tomatoes, but still. This is supposed to be chilly, wet weather, the height of our rainy season. Instead we’ve had very little precipitation this winter, and it’s looking more and more certain that we’re headed into a drought. It’s nice now, but we’re going to pay later for all this sunshine.

Still, we did enjoy the tomatoes. I put them in a simple green salad that I learned to make from Sam’s mom: it’s like California summer in a bowl. Or, increasingly, like California February.

Nonna’s Fresh Salad

Take one head of green lettuce, washed and torn into bite-sized pieces. (I used romaine because we got some in our box, but the salad is even better with a more tender kind of lettuce, like curly red-leaf or butter lettuce.) Toss with one or two diced tomatoes, a diced avocado, and a generous handful of crumbled goat cheese.

For the dressing, use one part white balsamic vinegar and two parts good quality olive oil, whisked into a vinaigrette with a pinch of salt and some freshly ground pepper. I know this next sentence is going to make me sound like an unbearable hipster, but I’ve started using sea salt in my vinaigrettes and it really does make a difference—not the coarse-ground, chunky sea salt, but the kind that has a texture close to cornmeal. Or even fleur de sel if you like: this is the kind of simple, fresh dish where fancy salts have a chance to shine.


Sep 23 2011

Recipe link: Charred Lamb and Eggplant

We’re getting a lot of eggplant in our veggie box right now, so I’ve been making a lot of dinners out of this recipe: “Charred Lamb and Eggplant With Date-Yogurt Chutney,” from the New York Times. It’s phenomenal. We eat it wrapped in flatbread and it is so, so good.


Mar 30 2011

Swiss Chard Soup

While we’re on tenterhooks to hear about Robin’s preschool (they say that “In early April we will notify all interested families with either an Admission Invitation or a notice that they have been placed on our waitlist”), spring has arrived in the Bay Area—but the swiss chard is still coming. Luckily I’ve discovered a new chard recipe to put into the rotation. This swiss chard and lentil soup is super-healthful, easy to make, and comes together quickly (although you do need to soak the lentils for a few hours beforehand).

Credit for this recipe goes to The Silver Spoon Cookbook, which was a wedding present to us from my sisters-in-law. I use it all the time!

swiss chard soup

Right, so, first, a few hours before dinnertime, put 2/3 cup of lentils in a bowl covered with cold water, and let them soak for three hours.

Then when you’re ready to actually make your soup, chop up an onion, a clove of garlic, a celery stalk, and a carrot. Tear up the leaves from a bunch of swiss chard, coarsely chop the stems (discarding the tough ends), and wash thoroughly.

Bring six and half cups of chicken stock (homemade is immensely better, as always) to a simmer. You can either do this in the pot you mean to use for your soup, or you can use a smaller pot and do the next part in the stockpot. You’re going to need two pots, is what I’m saying. So! Either you now have an empty stockpot (or Dutch oven), in which case you are going to want to use it to heat up three tablespoons of olive oil over medium-high heat, or else you are going to go fetch a big skillet and use it to do the same thing. Add the chopped veggies and chard stems (but not the leaves) and sauté until lightly browned, about ten minutes.

Oh! I have a question for someone who has access to an OED. Wikipedia says “The French word ‘sauté’ is a past participle of to jump. This refers to the need to have pan and fat, or oil, to 500 degrees or higher. Whole butter and many oils will not withstand this amount of heat without reaching their ‘smoking point,’ meaning the temperature that they begin to burn. When ingredients are added to this amount of heat they hop and ‘jump’ around in the pan, confirming that you have begun with a sufficient amount of heat.” Meanwhile Wiktionary says “French sauté, past participle of sauter, to jump, because the cook shakes the pan to make the food move around.” What does the OED say?

Anyway, your veggies are browning now, so go ahead and stir in the chard leaves and cook until wilted (just a few minutes). Drain your lentils and add them to the pot (or skillet, whichever you’re using) along with two tablespoons of tomato paste. Stir it all up.

Now, if you’re cooking the veggies in your stockpot, then go ahead and pour your hot chicken stock in there too. Otherwise, if the stock is in the big pot and you’re cooking the veggies in a skillet, then you’re going to add the veggies to the stock. You see how it works. In any case, now everything’s in the same pot. Yay! We’ll have soup soon!

Bring that stock back up to a (low) boil and add 1/2 cup brown rice, along with a rind of Parmesan cheese if you have one on hand (it’s always good to save your Parmesan rinds, they add a very nice complexity to soups). Put in a tablespoon of salt, or less if you’re sensitive to salt, but I like to go big with it. Grind in some pepper too. Let the soup continue to cook at a low boil/fast simmer until the rice is tender. Soup’s up! Fish out that Parmesan rind before you serve it, and dish it up drizzled with olive oil and/or a dusting of fresh-grated Parmesan.


Dec 10 2010

Winter Comfort Food

risotto

This risotto with cabbage and ham recipe (from Cook’s Illustrated) makes a filling meal for cold nights. You dice up an onion and a small amount—2 to 4 ounces—of pancetta, deli ham, proscuitto, or cooked sausage. Heat up three tablespoons of olive oil in a big heavy pot or Dutch oven over medium heat, and sauté the onions and meat for a few minutes. Meanwhile shred half a cabbage and throw that into the pot too. Cover your pot and let the cabbage cook for about fifteen minutes (or until it is limp and beginning to brown), stirring every now and then.

When your veggies have softened, add about a teaspoon of salt and two cups of Arborio rice. Stir it up and add a cup of water along with two cups of chicken broth. (Home-made chicken stock will make this recipe drastically better.) Turn up the heat until the broth mixture starts to boil; then keep it at a simmer, stirring occasionally, for eight to ten minutes, or until the bottom of the pan seems dry when you stir the rice. Add a half a cup of dry white wine or vermouth and stir that in; when it’s absorbed, check your rice. If it’s not fully cooked, keep adding water a half a cup a time until the risotto is creamy and al dente. Meanwhile grate a half a cup of Parmesan. When the rice is done, stir in the cheese, check if it needs more salt (it will, everything’s always better with more salt), and serve hot.